
You don’t have to be intimated by High Altitude Cooking. Just making some small adjustments is all you need!
Ahh, High altitude cooking. Something that you need to get used to but its the status quo here, so it just seems normal. I’m sure if I went to sea level, I’d be like, what? This just cooked so fast! One thing I know for sure, cooking in Denver is a lot different than cooking in the mountains. Here is what I know.
The boiling temperature is different and lower than at sea level. In Denver, the boiling temperature is around 204 degrees F. At sea level its 212 degrees F. This doesn’t mean that you need to turn up the heat, it just means that you need to cook food a little longer in most circumstances. We also need to pay attention to evaporation. The air is so arid here that foods tend to dry out quicker. With this in mind, here are some of my observations.
1. Hard boiled eggs in Denver. This took some practice. Place eggs in cold water and bring the pot to a boil. Decrease cooking temp to medium-low and cook eggs for 15 minutes. Remove from heat and run eggs under cold water. The higher you go in the mountains, add 1 minute of cooking time for every 1000 feet. So at 10000 feet, it takes about 20 minutes to boil an egg.
2. I “can” or process a lot in the summer months and the biggest adjustments seem to be in the hot water processing times. About 15 minutes in a hard boiling water bath for both jams and veggies. I always cook my veggies before canning. Also, with the pectin for jams. Package directions say to cook the pectin for something like a minute- I cook my pectin and fruit for 4 minutes before adding the sugar and then it takes about 10 minutes to make the jam depending on the fruit. I don’t make any sugar adjustments. If I make a conserve or jam without pectin, it takes a good 35-40 minutes of cook time before the desired consistency happens.
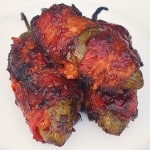
3. Roasting meats. I really don’t make too many adjustments here, except I always add liquid to the pan. Remember, its dry here, so adding liquid keeps your meat as it should be. It also is nice to make a sauce when done! In my experience, stuffing a turkey at altitude is a nightmare. It never seems to cook all the way through without having to cook so long that your bird is dry as a dessert. So my suggestion, cook your stuffing on the side. Also, a thermometer is your friend. Always have one handy and cook the meat to the right temperature! I have never had to make an adjustment on cooking time, except when something is stuffed!
4. Baking. I rarely do it, but do love a good cookie every now and then. When baking, in Denver, I remove one TBS of sugar and add 1 TBS of flour for every cup of dry ingredients. Everything else I keep the same. This works for me, but with ovens etc being so different, it’s good to experiment. This is just my general rule.
5. Making soups, stews, pasta, and rice. I have always followed package instructions and have never had to make an adjustment in Denver. In the mountains, I end up cooking everything for a couple of minutes more. Just know, you can always add more liquid if need be, but don’t turn the heat up.
6. Risotto. This is one food that will need a little more liquid. The general rule for risotto, one cup of arborio rice to four cups of liquid. Since risotto cooks low and slow, I always have an extra cup of hot liquid on hand.
Here are some links with good suggestions on High Altitude Cooking. For me, its been trial and error but these folks know so much more than me!
http://www.ext.colostate.edu/pubs/foodnut/p41.html
http://www.fsis.usda.gov/factsheets/high_altitude_cooking_and_food_safety/index.asp
http://en.wikipedia.org/wiki/High_altitude_cooking
http://aces.nmsu.edu/pubs/_e/E-215.pdf
http://www.bettycrocker.com/tips/tipslibrary/baking-tips/baking-cooking-high-altitudes
Happy Cooking!


I recently moved to Breckenridge (10,000 ft), and I just can’t seem to get white rice cooked without it being hard or too mushy from adding more water throughout the cooking process. I’m wondering how much water I should start with for 1 cup of rice and what process I should use to cook it.
Good for you! Fun place, I used to live there!! The thing is that at sea level water boils at 212 degrees and at 10000 feet, 194 degrees so things don’t get as hot and water evaporates quicker. I’d start with 1 cup of rice to 2 1/2 cups of water. Bring to a boil with the rice in the pot and then lower temp to simmer. It’s going to take longer. Probably 25-30 minutes. You need to give it time to absorb the water. Don’t lift the lid, at 25 minutes check where it is. If you have a glass lid this helps. IF it looks like it needs more water add in 2 tablespoon increments. The trick is time and not too hot of a pot. I also liked to soak my rice for a half hour or so before cooking to give it a bit of a head start before cooking! Hope this helps and keep me posted!!! 🙂
I sent your link to ten friends. As I talk to them I will encourage them to subscribe.
Good luck and have fun with it, Heather.
ja
Congrats blakester wish you alll the best!Greav looking pancetta recipe. Send my South FLorida zzzlobstaer Pasta after I re edit then you can ada[t to mountain settings.